
Tuesday, September 28, 2010
NOTD Ruffian/Moon Manicure
Today I did a different version of the Ruffian/Moon Manicure. This version is way easier to do because all you have to do is follow the natural line of your nails lunula (the white moon shaped area at the bottom of your nails). I used a sheer sparkly color as my base so that I could still see the line and then colored over with my darker color.

I used Diamond Love (April) from Orly and Go My Own Way from Sephora by OPI's Rocker Chic collection. Go My Own Way is a rich teal with flecks of blue glitter.
Thursday, September 23, 2010
NOTD Skulls
Other nail blogs I read have inspired me to do more exciting things with my nails. So in attempt to do so I decided to do some skull nail art! I used this video as a reference but instead of a nail art pen I used a #0 paint brush (which is why my cross bones are really jacked up). Its alright for my first attempt at freehand nail art but I definitely need practice because they all look a bit wonky.


What I used
-Avon Nailwear in Viva Pink
-Avon Speed Dry in Sheer Chiffon
-Sephora by OPI in Never Enough Shoes
-Rhinestone for thumb nails
-Seche Vite Top Coat


xoxo


What I used
-Avon Nailwear in Viva Pink
-Avon Speed Dry in Sheer Chiffon
-Sephora by OPI in Never Enough Shoes
-Rhinestone for thumb nails
-Seche Vite Top Coat


xoxo
Tuesday, September 21, 2010
NOTD Glitter Nails
I love using glitter on my nails! It's so sparkly, girly, and fun plus its super easy to use.
What I used:
 |
| Indoors with flash |
 |
| Indoors No flash |
What I used:
- 1 coat of Avon Nailwear Pro polish in Classic Fit (dark ink blue)
- Poly-Flake glitter in Turquoise (sprinkle on nail polish while it's still wet)
- 2 coats of Seche Vite top coat
 |
| Sunlight no flash |
 |
| Outdoors no flash |
Monday, September 20, 2010
Halloween Costume
So I settled on being Medusa for Halloween and today I went thrift store shopping with my friend Krystavel to find a dress I could alter into my costume. I had decided I wanted a green velvet dress and I got super lucky because thats exactly what I found! It's a dark green tank dress that has no shape but it's ok because I'm going to take it in and alter it. Now I just need to get some snakes for my hair and work on some make-up looks!
Super excited for halloween!
xoxo
Super excited for halloween!
xoxo
Friday, September 17, 2010
Blog Love!
One of my favorite nail polish blogs Forever the Ugly Duckling is doing her first giveaway and I'm super excited! I hope I win because she is giving away some pretty sweet things!

You should all go and check out her blog and follow and enter for your chance to win as well!
xoxo

You should all go and check out her blog and follow and enter for your chance to win as well!
xoxo
Thursday, September 16, 2010
NOTD Ruffian Manicure
This was my first attempt at a ruffian/moon manicure. The lines aren't really even but I think I still did pretty good and from a far you can't really tell. I used Sephora by OPI in Call Your Mother and Caffeine Fix. I did two base coats of Call Your Mother on my entire nail (let it dry completely) then two coats of Caffeine Fix on top of that forming a crescent moon shape at the base of my nail and then finished it off with Seche Vite top coat.


I really like the way this manicure looks although I think Call Your Mother blends in a bit too much with my skin tone to really appreciate the ruffian look.


I think I'm going to try a black and gold ruffian next time!
xoxo
Sunday, September 12, 2010
NOTD Galaxy Girl
Galaxy Girl comes from Orly's Cosmic FX collection of duo-chrome colors. The base color is a plum/wine color that is pretty dark and rich with specs of teal shimmer and a more subtle hit of pinkish/purple shimmer that is visible during certain angles and lightning.
I did four coats but only because the other night when I painted my nail I didn't let them dry completely and I got a few nicks and scratches on my nail so I had to do an extra coat to cover them. I also did pretty heavy coats because I like my nail polish color to be really dark and saturated. I also used Seche Vite top coat.

xoxo
I did four coats but only because the other night when I painted my nail I didn't let them dry completely and I got a few nicks and scratches on my nail so I had to do an extra coat to cover them. I also did pretty heavy coats because I like my nail polish color to be really dark and saturated. I also used Seche Vite top coat.

|
|


|
|


xoxo
Friday, September 10, 2010
DIY Glitter Artwork
Wooo I got another one of my projects done!
I was inspired to do this by some artwork I saw at Magnolia Cafe in ATX. If you've ever been to this delicious place to eat you know that they feature local artist work and one time they had some artist's work of famous peoples faces all done it glitter which looked really great and my friend Airica and I thought it would be really cool to so something like that. Well this summer I decided to give it a go the first one I did was the lips and I just finished the skulls.
Supplies you need for this project:
-Foam board with adhesive
-Glitter in your desired colors (this is standard glitter)
-Poly-Flake polyester glitter (this is really fine glitter)
-Elmers glue
-Razor blade/Exacto knife
-#0 Paint Brush
-#8 Bristly Paint Brush
-Foam Paint Brush
-Ruler
-Pen/Pencil
-Also you might wanna get some newspaper and some large pieces of paper to shake of the excess glitter
Ok so now on to the directions!
For the Lips Glitter Artwork
Step 1-I cut the foam board in half because I wanted this piece to be pretty big. I used my pencil and ruler to draw a line straight across to make sure it was a straight line all the way across then I used my razor blade to cut it.
Step 2-For this one I drew the image directly on to the adhesive liner. I used a picture of my lips for reference.
Step 3-Once I was done drawing my image I got my razor blade and cut/trace over the image.
Step 4-Lay out your newspaper also get your glue, foam paint brush, and glitter ready. For this one I used red, gold, silver and black.
Step 5- Start with the inner most piece and pull off the adhesive liner. Then pour glue on the area and use the foam brush to evenly spread the glue over the area then pour the glitter all over the area.
Step 6- Let the glitter dry for a bit and then shake of the excess glitter off and repeat the process until all the areas are covered in glitter.
Step 7-Lastly let it dry overnight and then you can hang it up!
For the Skull Glitter Artwork
Step 1-Printed out this skull image that I found you can get it here. I used the bottom left image and just enlarged it to fit on a piece of paper.
Step 2-Next I cut the foam board to the size of the paper using the ruler and razor blade.
Step 3-Remove the adhesive liner and stick on the piece of paper with image on it.
Step 4-Using the small Paint brush go over the lines of the image with glue and then cover it with black standard glitter. Start from the top working your way down to the bottom.
Step 5-Once your done covering the skull image with glitter let it dry over night or for a few hours. Once its dry get the other paint brush and brush off all the excess glitter.
Step 6-Once again get your paint brush, glue and this time the poly-flake glitter (fine glitter) and start covering the background with it working in small patches from the inside out. I used the foam paint brush for the area around the skull.
Step 7-Lastly let it dry overnight and then you can hang it up!
xoxo
I was inspired to do this by some artwork I saw at Magnolia Cafe in ATX. If you've ever been to this delicious place to eat you know that they feature local artist work and one time they had some artist's work of famous peoples faces all done it glitter which looked really great and my friend Airica and I thought it would be really cool to so something like that. Well this summer I decided to give it a go the first one I did was the lips and I just finished the skulls.
 |  |
Supplies you need for this project:
-Foam board with adhesive
-Glitter in your desired colors (this is standard glitter)
-Poly-Flake polyester glitter (this is really fine glitter)
-Elmers glue
-Razor blade/Exacto knife
-#0 Paint Brush
-#8 Bristly Paint Brush
-Foam Paint Brush
-Ruler
-Pen/Pencil
-Also you might wanna get some newspaper and some large pieces of paper to shake of the excess glitter
Ok so now on to the directions!
For the Lips Glitter Artwork
Step 1-I cut the foam board in half because I wanted this piece to be pretty big. I used my pencil and ruler to draw a line straight across to make sure it was a straight line all the way across then I used my razor blade to cut it.
Step 2-For this one I drew the image directly on to the adhesive liner. I used a picture of my lips for reference.
Step 3-Once I was done drawing my image I got my razor blade and cut/trace over the image.
Step 4-Lay out your newspaper also get your glue, foam paint brush, and glitter ready. For this one I used red, gold, silver and black.
Step 5- Start with the inner most piece and pull off the adhesive liner. Then pour glue on the area and use the foam brush to evenly spread the glue over the area then pour the glitter all over the area.
Step 6- Let the glitter dry for a bit and then shake of the excess glitter off and repeat the process until all the areas are covered in glitter.
Step 7-Lastly let it dry overnight and then you can hang it up!
For the Skull Glitter Artwork
|
|


Step 1-Printed out this skull image that I found you can get it here. I used the bottom left image and just enlarged it to fit on a piece of paper.
Step 2-Next I cut the foam board to the size of the paper using the ruler and razor blade.
Step 3-Remove the adhesive liner and stick on the piece of paper with image on it.
Step 4-Using the small Paint brush go over the lines of the image with glue and then cover it with black standard glitter. Start from the top working your way down to the bottom.
Step 5-Once your done covering the skull image with glitter let it dry over night or for a few hours. Once its dry get the other paint brush and brush off all the excess glitter.
Step 6-Once again get your paint brush, glue and this time the poly-flake glitter (fine glitter) and start covering the background with it working in small patches from the inside out. I used the foam paint brush for the area around the skull.
Step 7-Lastly let it dry overnight and then you can hang it up!
xoxo
Wednesday, September 8, 2010
Ahhhhh!
I'm so excited!!!!! I just found out that the Toadies are playing a show in the area that I live in! I've been wanting to see them for a while now and I missed them the last few times they played in Austin when I lived there. The tickets are pretty cheap too only $20! Now all I have to do is find someone to go with me.
Who wants to be my date? ;)
Ahhh so many things I want to do in October!
Which reminds me I also need to decide what I wanna be for Halloween. I've narrowed it down to three options:
-Peacock
-Ursula
-Medusa
I usually make my costumes or get them made so i just need to go fabric shopping and see what I find.
Wooo I'm excited for October!
xoxo
DIY Boxes
I finally finished one of my diy projects I mentioned in a prior post woo!
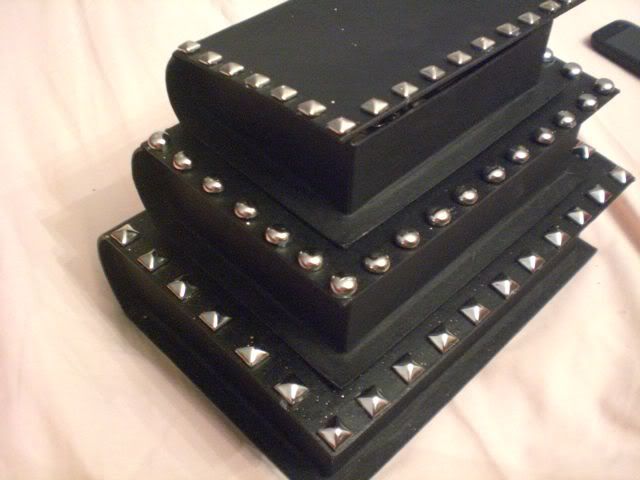
Supplies I used:
-Paper Mache Boxes
-Black Tempra Paint
-Spray sealant used for pastel, charcoal, and pencil drawings
(Instead of using the prior two supplies I would use spray paint or acrylic paint that way you won't have to worry about sealing the tempra paint since it's not water proof I just used it because thats's what I had on hand)
-Studs (small pyramid, large pyramid, and large dome)
-Needle nose pliers
-Hot glue gun
*I got most of my supplies at Hobby Lobby but you can find them at any craft supply store
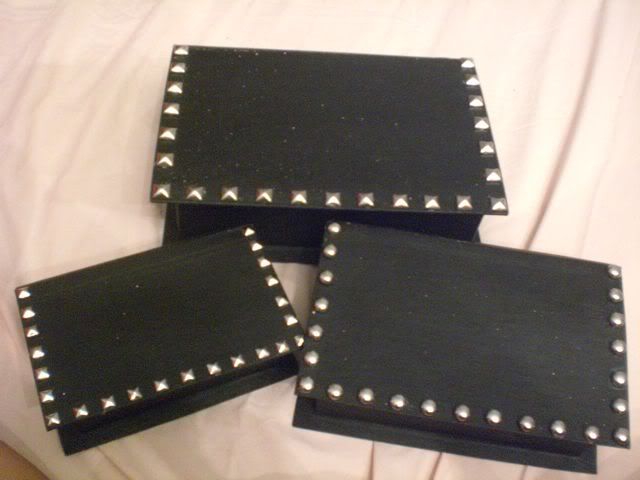
Directions:
Step 1-Paint your boxes (depending on what you used to paint them you might want to let them dry over night
Step 2-Get your needle nose pliers and bend down the prongs on the back of the studs (this is kind of time consuming but once you have all your studs ready to go the final step is really easy and fast)
Step 3-Get your glue gun and glue on the studs in your desired pattern and your done! (since the studs are metal they get pretty hot when pushing them down onto the box so just be careful not to burn yourself)

Supplies I used:
-Paper Mache Boxes
-Black Tempra Paint
-Spray sealant used for pastel, charcoal, and pencil drawings
(Instead of using the prior two supplies I would use spray paint or acrylic paint that way you won't have to worry about sealing the tempra paint since it's not water proof I just used it because thats's what I had on hand)
-Studs (small pyramid, large pyramid, and large dome)
-Needle nose pliers
-Hot glue gun
*I got most of my supplies at Hobby Lobby but you can find them at any craft supply store
Directions:
Step 1-Paint your boxes (depending on what you used to paint them you might want to let them dry over night
Step 2-Get your needle nose pliers and bend down the prongs on the back of the studs (this is kind of time consuming but once you have all your studs ready to go the final step is really easy and fast)
Step 3-Get your glue gun and glue on the studs in your desired pattern and your done! (since the studs are metal they get pretty hot when pushing them down onto the box so just be careful not to burn yourself)
*In total I used 23 studs per box and just lined the borders since I planned on stacking the boxes on one another
Hope you enjoyed this how to post!
xoxo
Sunday, September 5, 2010
NOTD
Yesterday I stopped by Sally Beauty Supply and I picked up Midnight Mission from the Vintage Vixen collection by China Glaze and the ever so popular Lubu Heels. I went in with the intention of getting Lubu Heels and to check out the new collection in person because I had only seen the colors from the website and had initially really like First Class Ticket but it was a lot darker than the image on the site. On the other had I didn't initially like Midnight Mission because on the website the color looked a lot lighter than it actually is it's more of a denim blue color with a silver shimmer.


I decided to paint my toenails with OPI's Glitzerland it has a really nice shimmer and the color isn't a yellow gold which I can't stand. Sorry the pics not that great but I didn't really want to take a close up picture of my feet because feet are just kind of awkward.


I decided to paint my toenails with OPI's Glitzerland it has a really nice shimmer and the color isn't a yellow gold which I can't stand. Sorry the pics not that great but I didn't really want to take a close up picture of my feet because feet are just kind of awkward.

Friday, September 3, 2010
Karaoke
So I've really gotten into karaoke this past year and have been going a lot to this bar where I live that does it every Wednesday and Friday night. I'm really surprised I've gotten into it so much especially because I don't have the greatest voice. I actually kind of suck at singing but I'm definitely not the worst that goes up to sing and its all in good fun anyway. I also usually sing with a partner so it kind of drowns out my bad voice. Anyways some of our favorite songs to sing are:
Total Eclipse of the Heart
Dixie Chicks (anything off the Fly album)
Wannabe
I Think We're Alone Now
Pour Some Sugar on Me
I Love Rock n Roll
I'm Real (I sang Ja Rule's part)
We like to mix it up when we sing that way we're not always singing the same songs so there is definitely more songs that we've sang but that would be way to many to list. Tonight my friend Krystavel and I are thinking of singing Welcome to the Jungle and Always Be My Baby.
What are some of your favorite songs to karaoke to?
Thursday, September 2, 2010
DIY
I've been working on quite a few projects this past month and yet to completely finish any of them. I really need to get on this and finish them because every time I start a new project my room just becomes more of a mess and right now it's really bad!
The first project I started on was making some earrings. I finished one pair but have yet to finish the other pair.
Second project was painting and decorating some paper mache boxes I have for some of my jewelry and other random things.
Lastly I started on some glitter artwork of a skull image but still need to finish it and then make one for my nephew as I kind of got him into liking skulls. Every time he comes into my room he likes to point out all the skulls I have in my room it's super cute!
So as soon as I finish these projects of mine I'll make a post about them with pics, but if your in the mode for some diy projects I like going to this site P.S. I Made This for some inspiration.
xoxo
Wednesday, September 1, 2010
Frosted Fuchsia
Todays NOTD is Wet n Wild's Wild Shine Frosted Fuchsia (426A). I don't remember ever coloring my nails this color before but it was in my nail polish drawer so I must have painted my toenails this color. It's a really rich fuchsia that does have a really nice shine to it which looks great in the sun light. I also really like this color because it makes my shorter nail stand out.
As you can tell I filed down my nails because they were getting to long and started to bother me when I type. I kind of have a cycle with my nails where I grow them out and then I file them back down when they get to long or chip because I have to have my nails all the same length and shape. Also my nails naturally grow in this oval shape.
As you can tell I filed down my nails because they were getting to long and started to bother me when I type. I kind of have a cycle with my nails where I grow them out and then I file them back down when they get to long or chip because I have to have my nails all the same length and shape. Also my nails naturally grow in this oval shape.
 |
| This is indoors with no flash and is most true to what the color looks like |
 |
| This is indoors with flash which makes it look a bit lighter than the color is |
 |
| Lastly this was taken out doors but I can't remember if I used flash or not |
Subscribe to:
Posts (Atom)